By Sarena-Rae Santos, Natural Health Blogger
When you first start your herbalism journey, you may find yourself overwhelmed. I mean, so many edible plants and herbs are brimming with health benefits. What do you choose first?
When starting your journey, I really recommend focusing on an issue you’d like to work on. For me, that was lung support for my asthma, followed by immune support. I also did an oral health focus after having my amalgam filling removed.
Many people use oil extractions as a base for other herbal remedies, usually applied topically. I decided to jump on the oil-pulling train. Instead of the standard coconut oil approach, I decided to add an herb with oral health benefits – peppermint. In other words, I made a Mint-Infused Oil for oil pulling.
Now for the moment, you’ve been waiting for – how to make an oil extraction.
How to Make an Oil Extraction
If you read our blog, How to Make an Herbal Extraction (With Any Herb), you know oil extractions are made by soaking dried herbs in oil and heating them to extract their constituents. Oil extractions are often the first step to creating topical creams, ointments, and massage oils (although this doesn’t work for all herbs). Sometimes, oil infusions serve as a functional food in recipes. There are two oil extraction methods – hot infusions and cold infusions.
Method One
Method one (hot-infused oil) is the most common oil extraction method because it’s the fastest. This method uses a double-broiler method to simmer dried herbs in oil for a certain timeframe (usually 2-3 hours). Although hot infusions have a one-year shelf life, they perform most optimally when fresh.
Let’s discuss step-by-step how to make an oil extraction, but first, let’s go over basic supply recommendations.
Recommended Supplies:
- Mason jar
- Herbs of choice (I use Starwest Botanicals or Frontier Co-Op)
- Oil of your choice (I use either organic olive or coconut oil)
Step 1: Gather 1 cup of dried herbs and ensure they’re chopped up. We do not recommend using fresh herbs as the water content may shorten the final product’s shelf life. If you only have fresh herbs, I recommend drying them before infusing the oil. To learn how to dry herbs, check out our blog, How to Dry Herbs.
Step 2: In a Mason jar, pour 1 cup of oil over the herbs and combine well.
Step 3: Fill a pot with water and place the jar in the water. Allow to simmer for 2-3 hours.
Step 4: After simmering, strain the mixture through a strainer covered in cheesecloth.
Optional: Some people use a French press to extract the remaining liquid after straining the mixture.
Step 5: Transfer to a dark-colored, glass, airtight container for long-term storage.
Storage: It will last about two years when stored in a cool, dark place like a cabinet. If you notice a rancid smell or visible mold at the top, it has gone bad.
Method Two
Method two (cold-infused oil) is made by soaking dried herbs in oil for a certain timeframe (usually 4-6 weeks). Many believe the best method for making cold-infused oils is to keep them on a windowsill for sunlight. Sunlight warms the herbs slowly (like the hot-infused oil method) and encourages the release of herbal constituents. Others prefer to steep their herbs in a cool dark place. I prefer the sunlight method because it makes the most sense to me. Whichever cold-infused oil method you use will yield a product with a one-year shelf life.
Let’s discuss step-by-step how to make an oil extraction, but first, let’s go over basic supply recommendations.
Recommended Supplies:
- Mason jar
- Herbs of choice (I use Starwest Botanicals or Frontier Co-Op)
- Oil of your choice (I use either organic olive or coconut oil)
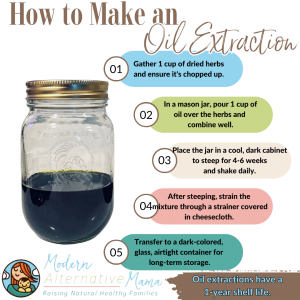
Step 1: Gather 1 cup of dried herbs and ensure they’re chopped up. We do not recommend using fresh herbs as the water content may shorten the final product’s shelf life. If you only have fresh herbs, I recommend drying them before infusing the oil. To learn how to dry herbs, check out our blog, How to Dry Herbs.
Step 2: In a Mason jar, pour 1 cup of oil over the herbs and combine well.
Step 3: Place the jar in a cool, dark cabinet to steep for 4-6 weeks and shake daily.
Step 4: After steeping, strain the mixture through a strainer covered in cheesecloth.
Optional: Some people use a French press to extract the remaining liquid after straining the mixture.
Step 5: Transfer to a dark-colored, glass, airtight container for long-term storage.
Storage: It will last about two years when stored in a cool, dark place like a cabinet. If you notice a rancid smell or visible mold at the top, it has gone bad.
When making oil extractions, some people add essential oils to them. Adding essential oils can add medicinal or preservative benefits. If you wish to add essential oils to your oil extraction, practicing essential oil safety is important.
Whether you’re a newbie or a seasoned herbalist, I hope this post was able to answer questions you may have had. Remember, herbalism isn’t all or nothing; every herbalist doesn’t look the same. It is okay to start slow, at your own speed, and figure out what works for you. Trial and error is the key, but hopefully, this post takes away most of the errors and leaves you with plenty of successful herbal remedies. Either way, with practice (and time), you’ll be making herbal remedies for everyone in your life in no time.


